Smoking ribs on a Weber Kettle is easy if you have the right equipment, and if you 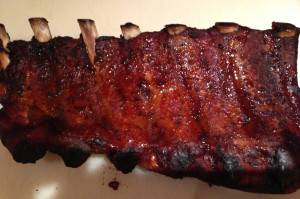 know the procedure.
For less than $16, you can turn your Weber grill into a barbecue smoker.
The following is a step by step guide, with an over the shoulder approach, on how to smoke truly world class baby back ribs.
When we published our review of the Weber Performer Charcoal Grill, we called it a best buy. Since then, we have sold thousands of dollars worth of them, and decided to find out if the Performer ( or any other 22″+ Weber grill) could barbecue ribs at least almost as well as a dedicated barbecue smoker.
What we found was astonishing. Not only did our tasters love the outcome, most of them preferred the ribs smoked on my under $400 Weber Performer to those from my $3,200 Pitts and Spits custom built barbecue pit! This next sentence is hard to write. I was one of them; the ribs smoked in the Weber Performer were better.
Equipment and Materials Needed
1. A Charcoal Grill, Minimum 22″ Diameter
Anything smaller won’t allow you to place the meat far enough from the heat source 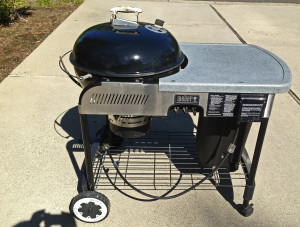 (fire) to keep the temperature down to 225 degrees F. Gas grills aren’t covered in this article, and probably won’t be…..anywhere on this website… for low and slow cooking. I’m not a fan of gassers for anything but high temp grilling for those lazy moments when we’re willing to sacrifice taste for convenience.
2. A Charcoal Basket
The charcoal and wood should be stacked vertically so as to keep them as far away from the food as possible. There are two alternatives:
A. The Smokenator
This device fits a 22″ kettle grill, and holds plenty of fuel. It also has a tank for water, which adds moisture to the meat. The Smokenator has strong reviews with some rabid fans, and is an elegant, well-built, drop-in solution for converting a Weber to a smoker. It’s also $60, and in my humble opinion, unnecessary, due to option B below. But, if you prefer a one step solution or are looking for a great gift for your favorite outdoor chef, here it is. Smokenator 1000 – Transform Your 22″ Weber Kettle Into Efficient Smoker.
B. A Weber Charcoal Briquet Holder and a Dollar Store Aluminum Pan (about $16 total)
If you have a Weber Performer or other Weber grills above the most basic models, you probably already have the briquet holder. They come in pairs, and are totally handy for lighting charcoal with a gas lighter, which in my opinion is an essential feature for a charcoal grill. You’ll use it more because the lighter makes it about 90% as convenient as a gas grill and the food from it tastes better.
If you don’t have the briquet holder, you’ll need one, and you can get it here: Weber Basket Charcoal Briquet Holders
Now you’ll need a drip pan for the rib drippings. You can get 3 for $1 at Dollar Tree. Fill it half full of water, and you’ll have both a drip pan and some moisture added. Or, as the internet marketers might say, an instant water smoker. Booyah! Same solution, and less money!
3. Charcoal and Wood Chunks
The grade of charcoal is important; don’t buy cheap stuff or Kingsford regular charcoal–too many binders and they do affect the taste. I often use Kingsford Competition Charcoal, and find it to burn hot, clean, and heat rapidly. In another article I gave an affiliate link for it, but I’ve pulled it because I’ve found it’s much cheaper and readily available locally.
Wood chunks can be of hickory, oak, pecan, apple or cherry, but hickory is the best choice. They can usually be found locally too at a Walmart, Target, or a barbecue specialty store. Online is sometimes cheaper though. Shop around, as you’ll use several chunks over the 5-7 hours you’ll be smoking your ribs.
4. Ribs
We cover purchasing ribs and preparing them thoroughly in BBQ Ribs Done Right, so if you’re not clear on the grade of ribs needed or how to properly prepare them, it’s all there for you. We used baby backs for this cook. I won’t buy ribs that aren’t Cryovac sealed, and these were from Swift. They were also previously frozen which I don’t like, but it’s getting more common in supermarkets. Your Weber grill will handle two rib racks, no more. That will serve 8-12 people.
5. Dry Rub
The ribs should be rubbed with your favorite dry rub and left refrigerated for 6-12 hours before cooking. My favorite commercial rub is Cookshack Rib Rub, but it’s getting hard to find in small quantities. I’ve been using a simple rib rub that I really like. I got it from one of the few books I strongly recommend, Bill Anderson’s Competition BBQ Secrets.
1/4 cup brown sugar or turbinado sugar
1 tblsp. Kosher salt
1 tblsp. Sweet Hungarian paprika
1 tsp. chili powder
1/2 tsp. garlic granules
1/2 tsp. onion powder
1/4 tsp. black pepper
1/4 tsp. red pepper
(Makes about 1/2 cup of rub)
Cooking Procedure
We’re going to use a modified version of the 3-2-1 cooking method, thoroughly explained step by step in our World’s Best BBQ Ribs Recipe. The mod we’re making for baby backs is 2-2-1 instead of 3-2-1 because with three hours of smoking unwrapped, they’ll dry out.
We’re going to smoke our ribs unwrapped for two hours, double wrap them in foil and give them another two hours,then finish them unwrapped again for another hour. Then, we’ll let them rest for an hour before serving. Let’s go.
Prepare the Grill With Charcoal
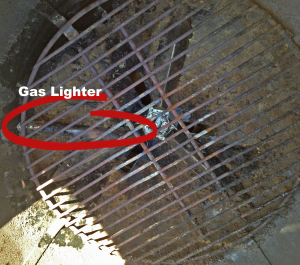
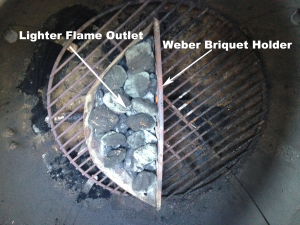
Fill the Weber Briquet Basket with charcoal, and place it over the gas lighter flame outlet. Using the electronic lighter ignition, light the flame, and let the charcoal burn to where it has white edges.
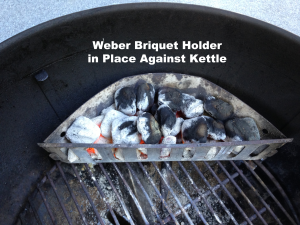
Once the charcoal is burning on its own, turn off the gas, and using tongs, move the charcoal basket tight against the side of the kettle.
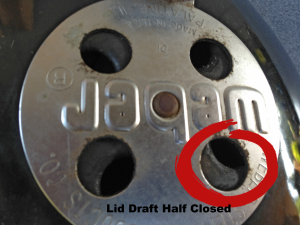
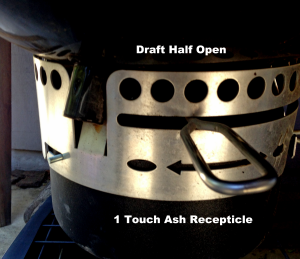
Even with the limited quantity of charcoal, your Weber will naturally heat to 300-325 deg with the drafts fully open. Closing the drafts part way will restrict airflow, and help drop the temperature. The quantity of charcoal and wood, and the drafts are how you control the temperature to keep it at 225 degrees. As we want to keep a good fire bed at all times, the drafts may need to be adjusted periodically. Below are pictures of the Weber Performer draft settings I found that keep the temperature where we want it. The upper draft never changed, however the lower draft was adjusted periodically.
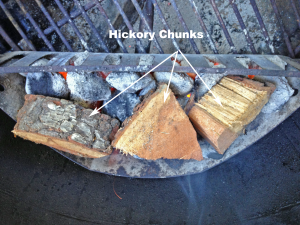
Once the thermometer reaches 250 degrees, add three chunks of barbecue wood to the burning coals, and wait for the temperature to drop to 225 degrees F. Adding wood will drop the temperature initially, as the oxygen coming from the bottom draft is absorbed first by the wood in order for it to start burning off hydrocarbons.
Once the desired 225 deg temperature is reached, place the ribs racks, which have been cut in half so we can get them as far from the fire as possible, as shown below.
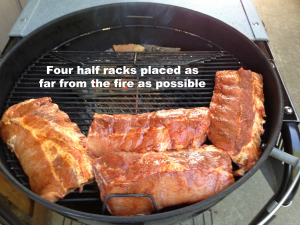 Cover your grill with the lid, and set your timer for 30 minutes. That’s when you should open the lid, and stir the fire so the wood chucks and charcoal burn evenly.
At the one hour mark, add wood as needed. I added one chunk. Then rotate the ribs back to front, front to back, and turn them over so the other side is up for the next hour. After another 30 minutes check the fire again; I added another hickory chunk and 4 briquets as the fire bed was getting low and the temp was starting to drop below 225.
At the two hour mark, it’s time to double wrap the ribs in aluminum foil. This keeps the juices recirculating and has a steaming effect that helps separate the meat from the bone. Add briquets as needed; we’re done with the wood chunks. 90% of the smoke is absorbed within the first two hours and we don’t want to overpower the ribs with smoke. I added 11 briquets and closed the bottom draft to the 2/3rds closed mark to further restrict air flow, keeping the temp down.
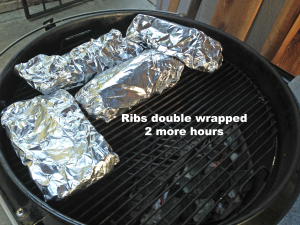 We’re going to keep the ribs wrapped for another two hours. Check the fire every 30 minutes and add briquets as needed. I added six more after one hour, and four more at the 1:30 mark.
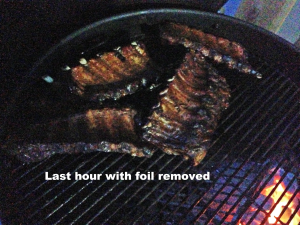
After a total of four hours has elapsed, two with the ribs smoking unwrapped, and two while double wrapped in foil, it’s time to remove the foil and place them back on the grill in the original position for about another hour. We’re now in flex time. Our goal during this final cooking period is to create a slightly crunchy exterior and finish the ribs to where they are about ready to completely separate from the bone. Mine looked like this after four hours:
After 30 minutes, start checking for doneness. The correct test is to pick them up about 25% of the way in with tongs and see if the larger end starts drooping and cracking at a bone. Until it does, your ribs are not done. This can take 30 minutes to 90 minutes and we have no control over the actual time. The old saying is true; it’s done when it’s done. You can add a chunk or two of wood now if you like a very smokey taste. I didn’t; I don’t want any hint of acrid smoke, but you can, especially if you’re using a lighter wood such as apple or cherry. Hickory is a powerful wood with a deep flavor, and too much of it can ruin an otherwise great barbecue .
Mine were finished in one hour. They looked perfect, with a nice, deep red color from the rub and the particulates released from the smoking hickory. Now, the final step is to let them rest for one to two hours, double wrapped in foil, with the foiled ribs wrapped in a large beach towel, and placed in a dry cooler. This step is extremely important, and should never be skipped. During the resting period the juices flow away from the bone,throughout the meat. This creates a much juicier rib with consistent texture.
Now is the time to apply a finishing sauce or a glaze, if desired. My OHY sauce is perfect for finishing as it’s thin and won’t caramelize during the resting process. You can get the recipe here.
After one hour of resting ,here is what I found when I opened the foil:
Those ribs could win a visual in most any local competition. The color is just right, and the slight glaze from my sauce makes them sparkle. But, check out how they look inside:
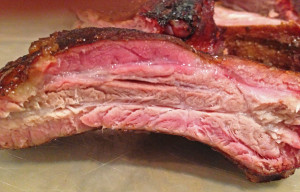 A beautiful smoke ring on the exterior, and succulent, juicy white meat in the center. That’s as close to perfect as I’ve ever turned out, and your will be the same if the procedures are followed.
Using these same procedures, you can make the best bacon you have ever tasted. You HAVE to try this!
If you’re not sold on using a Weber for smoking not just ribs, but any meats that do well barbecued low and slow, such as brisket, tri tip, pork shoulder, and chicken and turkey, then read our review on the Weber Performer. At the end, we do a quick review of the lower priced Webers too. They will turn out the same quality with the right accessories, but the Performer makes any outdoor cooking so much easier and more convenient.
If you’re ready to get a grill that will handle anything from steaks cooked at 700 degrees plus to ribs at 225 degrees, then get the Weber Performer Platinum Charcoal Grill now so you can be smoking ribs this weekend!
Limitations? Yes, the quantity you can cook is limited, as only about half the grill is usable. If you want to do more quantity and have more variety, then the top choice for a dedicated barbecue smoker is the highly rated, competition winning Weber Smokey Mountain Charcoal Smoker. This smoker, known as the WSM, is the standard for portable smoking and barbecuing. It’s about $400 but will last as long as any Weber–20 years anyway with proper care.
For a more economical solution and the ability to use gas or charcoal, read our review here for the $150 Masterbuilt 7-in-1 Smoker and Grill

Joel, I’m glad you posted your method, as our sister site sousvide4dummies.com addresses combining smoking with sous vide. As you’ve found, the two can co-exist better than nicely!
Upped my cooking to Sous Vide.. I use a pellet smoker tube on the 22″ and rub then smoke for 5hrs @ 150-160. I utilize a charcoal snake to accomplish this. Sous Vide for 18hrs @ 150. Sauce up and finish under the broiler.. Best dang moist tender ribs I’ve ever had. NO dry spots……..
A little late to the party, but I just followed your recipe as my first run on my new Weber Performance Deluxe! Absolutely delicious!
For anyone else new to this grill and/ charcoal grilling.:
DONT fill the single basket completely full with charcoal! I did, and it took a long time to get the grill cooled down to 250. Look at the pictures and you will see that his is not full.
Highly recommend a Thermoworks DOT and an air temp probe to go with it’s included internal spot probe.
The propane burner would constantly blow out under the lightest wind. I tried my moving the grill to no avail! What did happen is that I forgot the burner was on, as it blew out right about when I needed to turn it off. Left it on for quite awhile…Not happy about it, but maybe someone can learn from my mistake!!
Hi. I’ve made an initial attempt but overall I can’t seem to get the temperature down under 400 let alone 250 on my weber kettle 22inch.
I start about 3/4 of a chimney quantity of big green egg charcoal and light that amount in a slow and sear (vs the briquette holder). Vents open at first.
If I adjust the vents underneath to halfway I am still getting an indirect temperature in the 400’s. And if I close it even further to where I just see a slit, it’s still in the high 300’s. Using a themoworks pop with ambient probe to take the temperature.
Any thought on how to reduce the temperature. Maybe less charcoal?
Steve, you’re actually going to bring it down to 250, as it will be a lot hotter at first. So, vents open, let the charcoal get a good start with white edges, then close the vents halfway and start watching and adjust as necessary to get to and maintain 250.
Quick question….when first getting the Weber to 250, is it best to leave the vents all the way open and then regulate, or attempt to regulate right off the bat?
The added charcoal units are unlit, out of the bag. It’s nice to nave a propane or butane torch handy in case you need to re-light–that feature is self contained in the Weber Performer and another reason I really like mine.
Great step by step! Thanks for sharing. Quick question? When you mention adding 4 briquettes here and 11 there, are you adding unlit or have you already lit in chimney before adding. Just curious. Thanks again!
Adam, thanks for that, and so glad it worked out so well for you–especially in your chef friend’s face!
I just wanted to say thank you for writing this article. I followed your directions step by step. My ribs turned out so well that my neighbor (a chef) was mad that I got such good results my first try
Travis, you can’t steal what belongs to you 😉 They are on here because they’re tested, proven, and delicious. Hope you enjoy all of them!
Those ribs look amazing. Definitely going to have to give these a go. I stealing your recipe 😉
Fantastic job. I really enjoyed what you had to say, and more than that, how you presented it.Too cool!
Succulent, thanks a lot for this!