Inspired by this month’s issue of Cook’s Illustrated article on grilling corn, but not impressed with the recipes or convinced the procedures were the best, I threw together a few common ingredients to see what they would do to an ear of corn. It was truly a home run! Our family normally adds nothing to corn but salt and pepper, but this simple recipe might convince us–and you–of a better way to enjoy corn with your dinner on a beautiful summer evening.
Recipe for 3 ears of sweet white corn
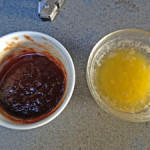
2 tbs. butter, melted, with a pinch of garlic powder
3 tbs. Heinz Chili Sauce
1 tsp. brown sugar
dash of Pickapeppa Sauce
Hickory smoke powder
Salt and fresh ground pepper
Combine the Chili Sauce, brown sugar, and Pickapeppa in a small dish, refrigerate for one hour.
Grilling the Corn
Prepare your gas or charcoal grill, bringing it to a temperature of 500° – 600°F.
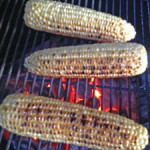
Brush the corn with a light coating of the garlic butter, and sprinkle on some hickory powder evenly. Place the ears directly over the hot coals. Grill until you can visibly see some char marks. This step is to kick start the Maillard Reaction to get the enzymes in the corn activated–and to greatly enhance the final taste.
This process should take about 10 minutes. Roll the corn 90° every few minutes to get an even char coating. Oh! Almost forget–yes it will POP. After all, it’s corn under direct heat.
 When you’re happy with the char marks, you’re ready to pull the corn and add the sweet chili sauce. You’ll need some aluminum foil.
Place each ear on about a 15″ x 12″ sheet of foil. Brush on more butter, then the sweet chile sauce. Then grind some sea salt and fresh ground pepper over the corn to taste. Roll the ear up in the foil tightly, crimping the ends, and replace on the grill, but this time away from the fire. This is the flavoring and cooking stage. Allow the corn to cook sealed in foil for 20-30 minutes.
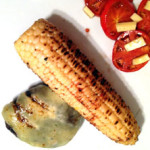
Using tongs, carefully remove the corn from the grill, and unwrap each ear. You will smell the  aroma–it’s subtle but tantalizing. It will have some mild heat, a little sweet, and a hint of smoke. We served it with some grass fed ground beef from our local Lucky Dog Ranch, and sliced garden tomatoes in balsamic vinegar and olive oil,topped with some local garlic jack cheese from Spring Hill Cheese. I don’t know any better and reasonably healthy summer dinner.
Let us know what you think, and any mods you did to improve!
Resources
Hickory powder is similar to liquid smoke in powder form. I prefer Wrights Liquid Smoke in brines and marinades as it’s very concentrated and produces a definite smoke flavor. For direct application to meats and vegetables, however, I strongly prefer powdered smoke. It’s much less concentrated and easier to control the degree of smoke flavor. I think the flavor is more mellow than liquid smoke, and prefer it, overall. It’s closer to the real thing than liquid smoke.
I get mine from Great American Spices. They have a flat shipping rate of $5.99, so try to order a few more spices to bring the net cost down. I try to buy most spices in small quantities to keep them fresh, and everything I’ve received from Great American Spices has had a great nose and appears to be very fresh. They have many items you can’t find locally, or on Amazon, at least at competitive prices with shipping. I recommend adding on the worcestershire powder and charcoal seasoning, and the smoked hickory salt if you don’t want to smoke your own.
Pickapeppa Sauce is one of my secrets, and I use it in many of the recipes you’ll find on the site. I’ve never seen anyone else list it for ingredients. It’s similar to worcestershire sauce, but it’s less vinegar-y and has lots of citrus. Plus, it’s wood barrel aged. It comes from Jamaica, and has been made there for over 90 years. It comes in one size–a 5 oz. bottle– and it’s not inexpensive. The best deal is probably at your local grocery store in the sauces and condiments section. Amazon has it, but it’s not a good buy there. I’d strongly encourage you to pick up a bottle and try it. It’s also an important ingredient in my OHY Barbecue Sauce.
Lucky Dog Ranch in Dixon, CA sells only at local farmer’s markets, unfortunately, as they are a great resource with a top quality product. I paid $5 pp for 5 lbs. of ground beef, which they claim is only chuck and sirloin, and only about 10% fat. Plus, it’s dry aged 20-28 days.
Although I haven’t done a proper pre-cook and post-cook scales-based test yet, it’s clear that the net yield (the finished burger on your plate) is much greater than from conventional 20% fat ground beef (with undisclosed meat cuts) that goes for $3.50 per pound locally. Consequently, the cost differential is less than the $1.50 per pound premium we pay; it may be close to the same for the net yield as the shrinkage is minimal with grass fed beef. A 1/3rd pound burger, weighed pre-cook, is plenty for a meal. That means three of us can eat for $5 per meal. We rarely use a bun for these burgers–the taste is so great we don’t need the additional condiments.
Spring Hill Jersey Cheese in Petaluma, CA sells at farmer’s markets and has an online store, too. I did a test purchase and I came up with $6 for cheese and $30 for shipping! This is a new resource for us, and I’m impressed, but I think I’ll stick to the farmer’s markets!
Look around your area for farmers markets–they can be a wonderful venue for picking up super fresh local meats, cheeses, veggies and fruits. You might have to try a few organic beef producers to find one you like, but if you find the right one I think you’ll be joining me as a big fan. It just tastes better and has much less fat. I infuse a little bacon fat from my homemade bacon that adds a beautiful hint of hickory smoke and a little juice. Grass fed beef can be a bit dry.

Leave a Reply