How to barbecue pork ribs is one of the most frequent questions we get here at the site. The process is not particularly difficult, although to serve the perfect rack of ribs there is some mandatory preparation. Follow the procedure, tips, and a few rules here, and even a new to the Q outdoor chef will produce award winning pork ribs the first time.
Meat: Your choices will generally be spare ribs or back ribs. Spares are meatier and cheaper. Back ribs are smaller, and more expensive, but with less waste and a sweeter taste. Personally I prefer a quality spare, but they’re hard to find as most people now buy baby backs or back ribs. Regardless, unless you know your butcher well, always buy Crovac and branded ribs, like Swift. You will pay slightly more but get much better quality usually than if they are locally cut. For sources, Costco is excellent, and local supermarkets can have comparable quality and are competitive when ribs are on ad. Unfortunately, we’re seeing more “previously frozen” ribs at the local stores, and it’s much better to get fresh racks if you can. Pork ribs do not freeze particularly well.
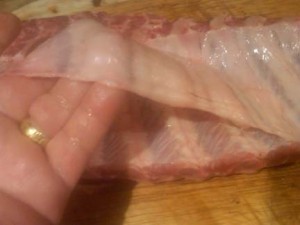
Preparation: Few meats can be thrown on the grill or barbeque without some prep, and ribs are no exception. For spares, the flap meat in back should be cut out and discarded. For either spares or back ribs, there is a thick membrane in back on the bone side that needs to be removed. Many people do not, and skipping this step will affect the flavor and tenderness of your product greatly. Here’s how to remove it:
1. Start by working a butter knife between the meat and the membrane.  Once you have the two separated, insert a finger between them and start slowly working the membrane away from the meat. There is a motion and feeling that will be very familiar but I won’t describe it as you’ll get it pretty quick;-) If you’re good you can remove the entire membrane without breaking it. If you do, don’t worry, just pick up the process in the remaining membrane area.
IF you want a crunchy rib, and there are a few that prefer that texture, all you need to do is omit this membrane removal step, but score the membrane diagonally, both directions, like a series of “Xs.”
2. Apply Rub A rub is a mixture of dry spices. You can make up your own, or as most do, buy a commercial product. Be sure you buy a pork or rib rub; these are sweeter than a general or beef rub.
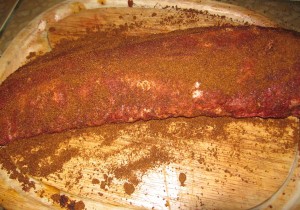
This is not the time to be dainty. If you’re producing several racks you will have your rub in an aluminum tray for dredging, but if you’re doing one or two you will probably sprinkle the rub on. Take off the plastic top with the holes, and dump out a tablespoon on the back, or bone side.  Now, with your fingers, gently rub it in so all the surface is covered. Important! Leave it set until you see the meat “sweat.” This means the rub is being absorbed. Now, turn over the rack and repeat on the meat side. The finished rack will look like this
Refrigerate from 4-12 hours. Longer and the meat may turn mushy. less and the rub will not have the penetrating effect desired.
Whatever you do, never marinate pork ribs. It’s just wrong.
If you’re using spares, cooking for 4 hours or less, and want to produce “fall off the bone” ribs, use a restaurant trick and sprinkle with Adolf’s Meat Tenderizer 30 minutes ( no more) prior to putting the ribs on the grill. Be sure to use Adolph’s as it’s citrus based, and you don’t want an MSG product eating your stomach lining. This is a secret, and you don’t have to tell! Be sparing here as Adolph’s is salty.
UPDATE May 2013
If you have limited time, proceed with these instructions as your ribs will taste great! However, if you can plan ahead 7-8 hours, our new 3-2-1 method will produce even better, championship quality ribs. Here’s the step-by step article, World’s Best BBQ Rib Recipe.
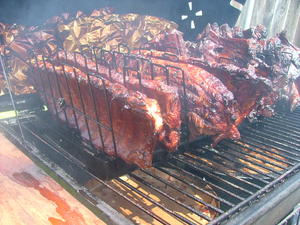
Cooking: Ribs can be barbecued or grilled, but you’re rarely hear of a grilled rib winning a competition. Low and slow is the key, and that means about 3-4 hours at 225 degrees. I use a rib rack which keeps them vertical for even heat and smoke. Hanging accomplishes the same thing. If you lay them flat on the grill, be sure to rotate the exposed sides every 30 minutes or so.
The rib is done when you pick them up with tongs at about one third to half the length of the rack, rack inside the tongs, and the loose half starts to fall away from the bone.
Updated July 2013: Go to a more complete discussion on how to tell when your ribs are done
If you feel you’re within 20 minutes of finishing, apply a finishing sauce. If you’re using a thin BBQ sauce you can use that, or (heaven forbid) if you’re using a thick sauce, cut it with some water or vinegar and brush some on prior to pulling the ribs. This is a step used in competition, and provides a nice glaze and a little extra taste.
Let Them Rest: DO NOT OMIT THIS STEP! Never serve ribs off the grill. You will lose much of the smoke flavor as it’s in the extremities. First, double wrap the ribs in foil, and that means two layers of good, commercial grade aluminum foil. Then, wrap them in a beach towel. Then, put them in a cooler and let them set for at least two but not more than four hours. You will be amazed at how warm they still are, and how tender the meat has become over that time.
Serving: Never sauce ribs heavily when serving. If your guests are experienced rib eaters, they will likely not want any sauce at all, however always put some on the side. As to sauce, pay attention to it and don’t just buy anything, like KC Masterpiece. That’s thick gooey stuff that should be illegal! Get a fairly thin sauce, or thin out what you have with some vinegar. The ideal sauce will be hot on your throat, and sweet on your tongue. If it’s hot on your tongue, you’ve got too much cayenne. You can’t kill that; cut back next time. My favorite commercial sauce is Dreamland, and the sauce that I make up is close. If you don’t want to make your own, order some Dreamland from Alabama. You won’t be sorry.


Leave a Reply