Making your own bacon is easy when you have the step-by-step instructions. Your artisan bacon will taste completely different than any grocery store bacon you’ve even tasted before, and at least ten times as good!
What You Need to Know About Bacon
Bacon is cured pork that, depending on the country and type of outcome desired, comes from the back, sides, or belly of the pig. In the United States we usually favor the fattier pork belly. Curing comes from extended soaking or dry treatment in salt and other agents that act to preserve, reduce contamination from pathogenic bacteria, and enhance the flavor of the meat.
Buying the Pork
Finding a pork belly can be challenging if you don’t live in an area with either a good butcher shop, or an Asian food market. You don’t need to buy a full belly. A full pork belly weighs around 12 lbs. You can easily buy a half belly, or in some cases as little as a pound. My first run at bacon was with a pound I bought from our local butcher. My second round was with a half belly that weighed 5.5 lbs before trimming. After I removed the rind and trimmed the fat, the net weight was 4.2 lbs.
Prices vary. I paid $4.49 pp for my first pound. When I bought a half belly I paid $3.99 pp. Our local 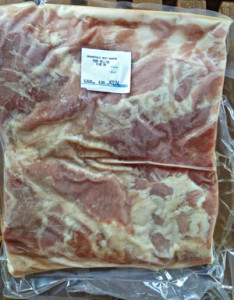 Asian market gets $4.49 pp for a half belly. Budget $4.00 – $4.50 per pound, but you may find it for less, especially if you buy a half a belly or more.
Pork bellies can be purchased online, but the prices are crazy high–$10 pp or more plus shipping. Good quality artisan bacon cured, smoked, and ready to fry will run you around $20 per pound. You need to make your own, but you might have to make a few calls to find a retailer that carries it, or is willing to bring some in for you. If you have to purchase a whole belly, do it. You will use it faster than you think. If you find a good source, let us know below in the comment section.
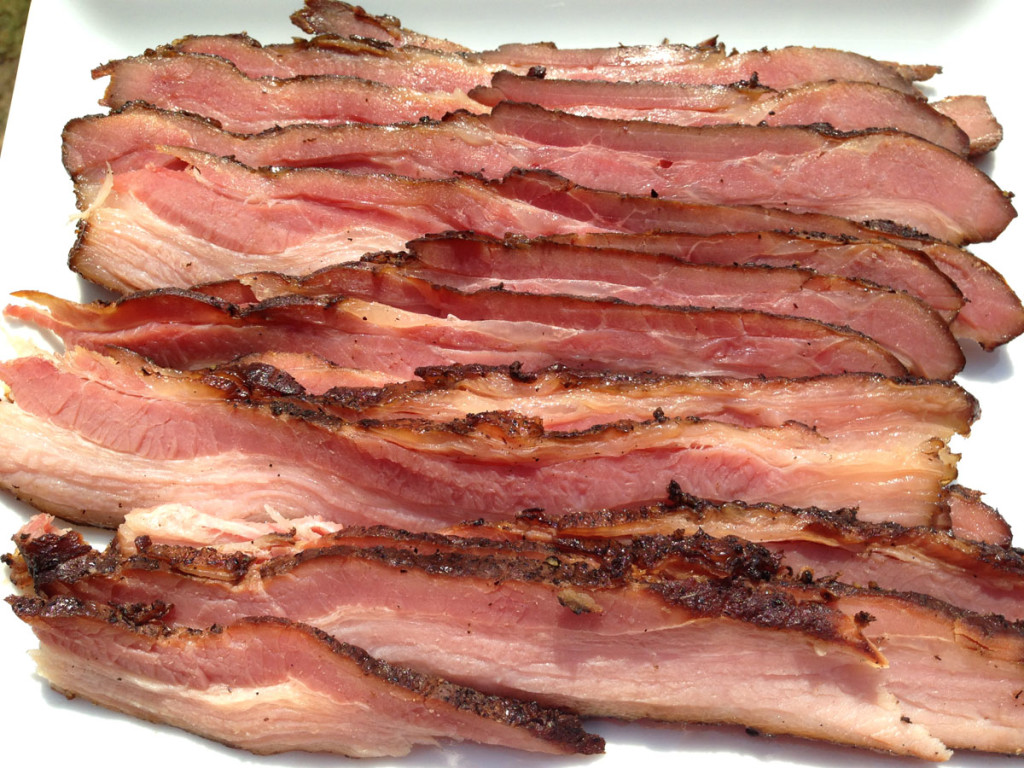
My first belly was fresh, as they had just received a case. The butcher cut out the “center meat” and sold me a pound. Knowing what I do now, I would not accept that again. The center meat can be very fatty, though not always. I had at least 40% waste on that pound. The half belly I subsequently purchased was frozen. It was from the same butcher, and he told me they immediately process and freeze when they come in. There was no difference in taste or texture between the fresh and frozen bellies; the difference was the half belly had much less fat and more meat. The first picture of the sliced bacon is from that half belly. By the way, those slices had not been cooked yet. Did it fool you?
Don’t buy raw pork and let it sit around. It decays quickly. You should be ready to start processing the day or the day after you buy your pork belly.
Ingredients and Equipment Needed
-Pork belly
-Kosher or fine grain sea salt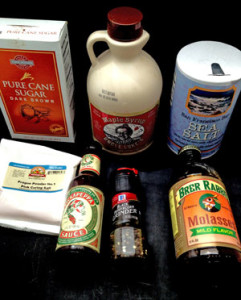
-Ground pepper
-Brown sugar
-Maple syrup
-Curing salt
-Molasses
-Pickapeppa Sauce
-a food or postal scale
-2 sharp knives, one with a serrated edge
There are several recipes on the Internet, and the basics don’t vary much. I took a little from several sites, and put together my own. It was just one of those times where your best guess turned out better than ever imagined.
I would recommend trying this exact recipe first, as it is proven to work, with a spectacular taste. After a few cooks, feel free to experiment, but NOT with the proportions of salt or pink salt.
The proportions in this recipe are linear, meaning you can take the one pound recipe below and multiply each ingredient by the actual weight. For example, our recipe calls for 1/4 teaspoon of pink curing salt per pound of pork belly. DO NOT EXCEED THIS AMOUNT PER POUND. For three pounds, you would use 3/4 teaspoons, and even these quantities are slightly greater than the Prague Powder #1 instructions, which are 1 teaspoon per 5 lbs. of meat.
About Pink Salt and Sodium Nitrite
Pink salt is not naturally pink. It is colored so you’ll know it contains sodium nitrite, which is toxic to humans in large quantities. It’s very important not to exceed the 1/4 tsp per pound proportion (for Prague Powder #1), as this is a very safe quantity.
Some people prefer not to use sodium nitrite in their cooking. Is it mandatory for curing bacon? No, but eliminating it will decrease the effectiveness of the decontamination process, your finished product will not last as long, your bacon will be brown rather than a deep red, and the taste may change slightly and be a little lackluster.
I recommend using Prague Powder #1 for this recipe. This mixture of sodium nitrite and salt does not contain sodium nitrate. You can use other curing agents like Morton’s Tenderquick, but you’ll have to adjust the added salt, as TQ contains a lot of it, along with sodium nitrate. In general, Prague Powder #2, which is used for long cure periods where the meat will not be cooked (like many sausages) has the same ounces per pound recommendation as Prague #1. Morton Salt has several curing products, including the popular Tenderquick, also used for short cures , and the recommended ounces per pound varies by the product and meat being cured. I use curing salt for a lot of my smoking, and I use whatever the recipe calls for. Converting is too risky, in my opinion. Most recipes either call for Prague Powder #1, Prague Powder #2, or Tenderquick.
Please double and triple check the recommended proportions of curing salt before using. Check the manufacturer’s site if possible. I believe my information is correct, but am seriously appalled at some very popular barbecue and cured food sites and top selling books that recommend quantities of curing salt that are double to quadruple over the manufacturer’s recommendations. Be safe and be smart. Do not exceed the manufacturer’s recommendations (which are the same as the USDA limits) for these potentially toxic curing agents, and if you see an error here, or any site, please alert the author.
Finding Prague Powder #1 locally may also be a challenge, but it’s likely that your butcher shop or Asian market will have some. If they have a substitute, it’s imperative that you know the percentage of both sodium nitrite and salt. Prague #1 contains 6% sodium nitrite and 94% table salt. Making adjustments with different percentages is risky, so be careful if you do. You do not want any more sodium nitrate than is safe for you, and you don’t want to ruin your bacon by over salting.
You can buy Prague Powder#1 on line. Amazon has 4 oz. for a little over $10. That will cure 100 lbs. of meat! It does last though if you keep it dry. I bought one ounce from American Spices for not much, and they have a flat shipping rate of $5.99. If you’re buying a few spices that’s your best deal. If you’re buying only the Prague #1, and cannot find it locally, then Amazon is fine. If your butcher doesn’t have any, try your local Asian market.
Preparation of the Pork Belly for Curing
This is the most difficult part, as the tough rind should be removed prior to curing. Some leave it on, as it’s easier to remove after the smoking, but you will not get the full penetration of the brine nor the smoke if you don’t remove it now. If you buy a full belly fresh, you can ask your butcher to remove it. You’ll have to pay for the weight with the skin on of course, but having it removed saves a lot of work.
You’ll need two knives–one a thin bladed sharp boning knife, and the second a fairly long knife with a serrated edge. You can do the process with the first, but the serrated blade makes it a lot easier.
Lay the belly out flat on a flat cutting board over some plastic wrap. Starting at a corner, grasp the rind 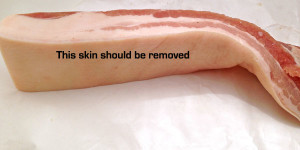 with your non-dominant hand, and with the other carefully insert the boning knife blade between the rind and the meat. Cut into it until you have a couple of inches of rind separated from the meat, being careful not to cut too deep and cut away the meat with the rind.
Now, take the knife with the serrated blade, and as you’re gently pulling the rind back, use a sawing action to free it from the rest of the belly. Depending on the size of the belly you have, you may need to repeat this process with the other corners.
Eventually you will be able to remove the entire rind. Although I didn’t keep mine, you can use it to make pork cracklings–you’ve seen them by the chips in the grocery store. There are recipes on the net if you’re interested.
Now, look for deep pockets of fat in the remaining belly. If they’re at the edges, cut them out and either discard or liquify with heat to make some tasty bacon fat you can use for burgers, on some salads, or for cooking vegetables.
Weighing Your Trimmed Pork Belly
It’s important to know the exact weight of the belly to be cured so you can use the proper amount and proportions of ingredients. The recipe below is for the meat after trimming. To my knowledge, there are no other recipes on the Internet that consider the weight reduction after trimming. Consequently, you can easily add too much sodium nitrite, putting yourself at risk, if you weigh and measure pre-trimming.
First, weigh the entire belly on your scales. If you have a half belly or more, you will probably want to divide it into one-two pound batches so you can use some now, and freeze some after smoking.
After you have the weight, eyeball the proportions you want and cut the belly accordingly. I had a net 4.2 pound belly, and I cut it into four roughly equal one pound sections. Two I used for bacon and two I used for Barbecued Chinese Pork (Char Siu), which calls for an entirely different cure.
Wet Brine Recipe for 1 Pound of Pork Belly for Bacon
- 1 pound of pork belly after trimming
- 1 1/2 teaspoons kosher salt or fine grain seal salt
- 1/4 teaspoon Prague Powder #1
- 1 1/2 teaspoons fresh ground black pepper (use a pepper mill–you WILL taste the difference)
- 1 tablespoon brown sugar (dark is better)
- 3 tablespoon Maple syrup
- 1 tbl. molasses
- 1/2 tsp Pickapeppa Sauce (sub Worcestershire Sauce if you can’t find it, but most chain grocers carry it)
- 1/3 cup water
Mix all ingredients (except the pork belly–duh) thoroughly with the water and set aside. Be sure all salts are fully saturated in the liquid. You may have to apply some heat–just pull it before it boils. I didn’t use heat.
There are ongoing debates about using a wet or dry brine. Wet brines are safer because you’re virtually guaranteed equal coverage of the meat. Dry brines which are rubbed on can cure unevenly. Stick with the wet brine for bacon.
Starting the Cure
Place each section of trimmed pork belly in food safe plastic bags, and pour in the brine mixture you made from the above recipe. Be sure all pieces are thoroughly covered in the brine. I usually use two one pound sections per bag. Squeeze all the air you can out of the plastic bag, set in a tray so if the bag leaks the brine won’t drop on other food in your refrigerator.
The standard minimum cure time is 7 days per inch of thickness of the belly. You can let a 1″ thick belly go for 10 days if you like a sightly stronger flavor. I pulled mine after 7 days. Pork bellies do vary in thickness. If you buy a pork belly slab from a factory hog, the chances are it will be about 1″ thick, pre-cure. Curing will increase the thickness. However, if you are able to find a hog farm with organic feed, your pre-cured belly could be 3″ thick. Measure to be sure.
Each day, take the tray out of the refrigerator, and turn the bag(s) over so the meat resting on the tray is on the opposite side of the day before. Massage the pieces a little, and replace, making sure it’s all covered with the brining liquid.
Seven Days Later
After a week of curing, you now have bacon that is almost ready to be smoked. Remove it from the cure, 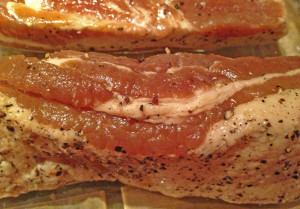 and dispose of the cure. Wash the surface of each section of cured belly under cold water gently to rinse off any excess salt. Put the cured belly back in the refrigerator in a clean tray, uncovered. to let it dry and form a thin surface layer called a pellicle. This step is more important when smoking fish than bacon, but it will produce a nicer finish after smoking. Give it at least 3-4 hours to dry and form the pellicle.
Smoking Your Bacon
This is the last step, and it’s very easy. You can use a dedicated smoker, or a charcoal grill like the Weber Performer. You can use a gas grill too, but you need to keep the temperature low–225°F is ideal.
Choosing your wood is a personal choice. I am very partial to hickory, and it’s all I usually use with my dedicated Cookshack smoker or the Weber for pork or beef. We don’t have hickory in our region, so when using the large BBQ pit I usually use white oak.
Some people like apple wood for bacon. I don’t think it generates enough flavor, but if you want a very light smokey taste, that’s a good choice too.
In all cases, you want the internal temperature to be 145°- 150°F. Pork needs to be at 145°F to be safe to eat, but remember you’re going to fry or bake it before you eat it, so don’t let your smoking phase get over 150°F. I pull mine at 145°.
Smoking on a Dedicated Smoker
Prepare your smoker with at about 4 oz. of chunk wood, no more. Weigh it to be sure, because even an extra ounce of strong wood can make your bacon taste somewhat acrid. Place your bacon on the racks, 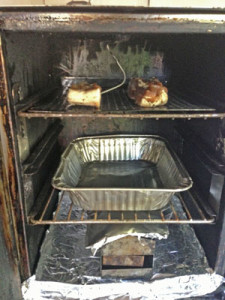 set the temperature to 225° F, and walk away. Start checking the internal temp with a good digital thermometer like this one we recommended after about 45 minutes. Depending on your smoker and the outside environment, your bacon should reach the desired 145°F internal temp in about 1-1.5 hours.
Smoking on a Charcoal Grill
Prepare your fire as we instructed in this article on doing baby back ribs on a Weber. Once your kettle thermometer that you calibrated with an oven or grill thermometer to be certain it’s accurate, and if not, you know the variance, shows a temp of no more than 225°F, put on three or four chunks (not chips or sawdust) of wood, and place your bacon sections as far away from the fire as possible.
Keeping the temp on a charcoal grill at 225° can be a challenge, especially during warm weather, so stick around close and monitor every few minutes. When your wood burns down, put more on until you have used 5-6 chunks of wood. The smoke from a Weber is less intense than from a closed smoker, but, to reiterate, too much smoke in a short time can create an acrid taste. Six chunks of smoking wood should be ample.
Start checking your internal temp after about 30 minutes. You want a minimum of one hour under  smoke, so adjust your vents accordingly. We tell you how in the linked article above.
Once the internal temperature has reached 145°F, pull your bacon. After you’ve admired the beautiful brown and red tones, double wrap it in foil, and let it rest for at least 30 minutes to let the juices disperse and the smoke flavor mellow out some.
Slicing Your Bacon
If you don’t have a meat slicer, you’ll need a good cooks knife. Of all the knives I own, some very expensive, this Montana Cook’s Knife is my hands down, go-to favorite. Check out the price too! Mine is about 10 years old now and I use it every day. It feels great in my hand, and takes a razor sharp edge, too. Use something with a wide blade, as you want to make the slices as thin and even as possible. A meat slicer is a real benefit here, but a good sharp knife like this one will do. The bacon in the first picture was sliced by hand, using the Montana knife.
Slice all of your bacon, regardless of whether you’re going to use it or freeze it. For freezing, I wrap mine in bags of three slices, vacuum seal it with my FoodSaver , and freeze it immediately. It will be good for several months as it’s vacuum sealed, and I can use as few or as many individual portions as I need, when I need it.
Cooking Your Bacon
Finally! You probably don’t need to be told how to fry bacon, but I’m going to recommend you don’t.
For some reason, your home smoked bacon has two characteristics the off the shelf production bacon does not. One, it’s not crunchy. I don’t like mine well done anyway, but if you do, you’re kind of out of luck unless you can time it perfectly without burning it. Two, it REALLY curls up BAD! The shrinkage is greater than you’re used to as well. For these reasons, I strongly recommend baking your bacon. Here’s how:
Preheat your oven to 350°. Line a cookie sheet with aluminum foil, and place a wire baking rack on top of the foil. Lay the bacon out evenly on the rack, and put the cookie sheet, rack, and bacon in the oven. Start checking in about 10 minutes. When it’s just short of the consistently you want, remove it from the oven. It will continue to cook for a couple of minutes and will be more done than when you pulled it.
You’re done, and ready to taste your artisan bacon! Brace yourself. You will freaking DIE, because it’s SO GOOD!
I’m going to give you an easy recipe that was given to me by my good friend Keather Kehoe. She’s an M.D., but thank God not a heart specialist, because with this recipe I’d suspect she had a life insurance policy on me if she was! Keather says to blame Thomas Keller, of French Laundry fame, for the original concept. This is about as unhealthy as it gets, but what-the-hell. It’s THAT good, and you’re not going to make it a habit. I need you to stick around as a reader too 😉
Here’s the start. I posted this much to my personal Facebook page and Keather suggested I add a fried 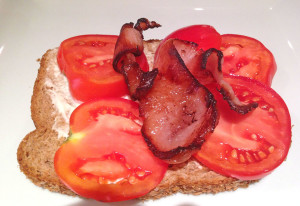 egg. I did. It was absolutely, wildly, delicious. Just get some bread you like, slather on some mayo, add some fresh sliced tomatoes from your garden, lettuce if you like, some of your killer bacon, then a fried egg, broken and over.
Let us know what you think, and as always, post any questions or comments. Have fun amazing your friends too. I guarantee you they will offer you money to make some up for them!
Random Addenda
- I buy my sea salt at Dollar Tree. It’s $1 for 26oz. and it’s from Morton Salt. It’s really the only salt you’ll ever need
- Use 100% pure Maple Syrup. It’s too expensive at the grocery stores. I buy it from Costco or Sam’s Club. Grade A or B, doesn’t matter. Get B if it’s cheaper, because it’s a bit darker
- When you’re almost done slicing your bacon, you’ll have some leftovers. Use them to make lardons (and don’t go hick and say LAR-DONS–it’s LAR-doan. No S, Pierre) Throw them in a small bowl, and microwave them for about 90 seconds, and you’ll have the best bacon bits ever.
- Save the bacon grease. This is different than the swail from store bought bacon. Close to duck fat for great taste.
- Try dipping your bacon in chocolate. No? Just TRY it 😉
- Grow your own tomatoes. Far superior to anything at the store.
- You may see some writing about how resting meat doesn’t improve the taste and allows juices to flow out. Ignore it. It most definitely does improve the taste, and the juices are actually retained, not lost, when resting. Here’s the science, if interested.I rest most pork, beef, and large poultry for one to two hours. 30 minutes is fine with this bacon.
- If you want to know about all different varieties of bacon, Wikipedia is your friend.
- Start making a Christmas list, and put a Foodsaver at the top if you don’t have one. It will pay for itself over time. Food lasts longer, tastes better, and you’ll cut way back on waste.
- As much we’re pleased with the Weber Performer as a low and slow BBQ cooker with some mods, please consider getting a dedicated smoker. The Weber Smokey Mountain reviewed here is perfect for this recipe and most BBQ, and if you want to smoke flavor fish, nuts, jerky, and cheese, we like the Masterbuilt 30-Inch Electric Smokehouse
. I use a Cookshack smoker, but although they are top quality and made in the U.S,. they have become very expensive.

Just tasted John’s Canadian bacon yesterday. I have been cooking and smoking for three decades and pretty savvy. Hands down excellent taste and processes. I will be expanding my repiteau.